ClickBank Bonus Script
CBGraph's ClickBank Bonus Script is available for free download.
How does it work?
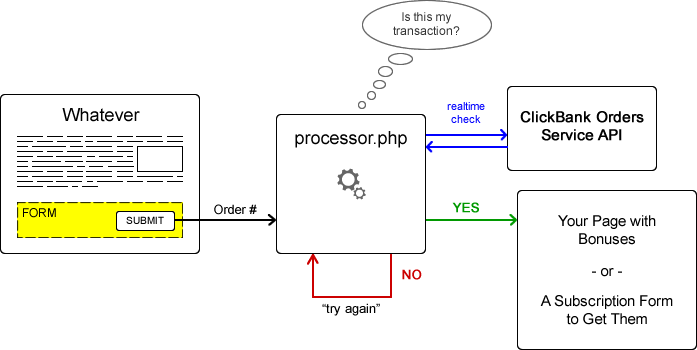
The ClickBank Bonus Script helps you to automate the process of giving additional bonuses to customers who have purchased some ClickBank product(s) through your affiliate link.
Our ClickBank Bonus Script does all the work for you. Once it's installed and set up, your customers will receive their bonuses without any action from your part. Moreover, this script can check the status of a customer's purchase and block their access to your page with bonuses if the purchase has been refunded or canceled.
To install it (see detailed instructions below), you put a very simple HTML-form on a page with your review of some product (or whatever other page you want). This form asks a customer to enter their ClickBank Order Number of the completed purchase. When the form is submitted, our ClickBank Bonus Script connects to ClickBank Orders Service API to get information about this order in real time. If you are an affiliate of this purchase and it has not been refunded or canceled, the customer is redirected to your page with bonuses.
Requirements
The ClickBank Bonus Script will be installed to your hosting account. Your hosting must support PHP 5.2 (or above) with cURL library.
Installation
Step 1. Get a Developer and Clerk API Keys
First of all, to make real time calls to ClickBank Orders Services API you need to have a Developer and Clerk API keys. To obtain them, log in to your ClickBank account and go to the "Account Settings" -> "My Account" section.

Scroll to the bottom of this page, there you'll see the "Clerk API Keys" and "Developer API Keys" empty blocks.
Let's create a new Clerk API Key. Click on the link "Edit" on the corresponding block:

Now, hit the "Create New Clerk User API Key" button:

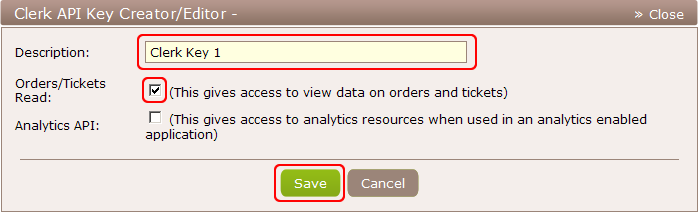
Check the "Orders/Tickets Read" checkbox, enter the description for this key (e.g. "Clerk Key 1") and click the "Save" button:
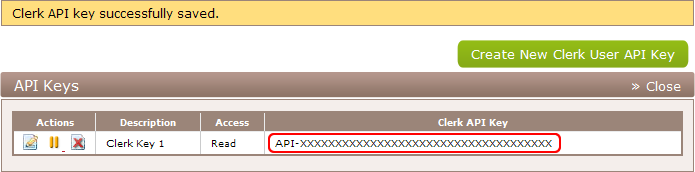
This will create your Clerk API Key:
Now, go back to the "My Account" section, scroll to the bottom and click on the "Edit" link of the "Developer API Keys" block:

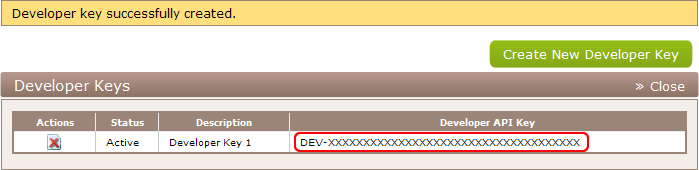
Hit on the "Create New Developer Key" button:

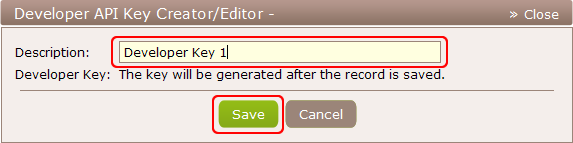
Enter the description for this key and click the "Save" button:
Now, you see your new Developer API Key:
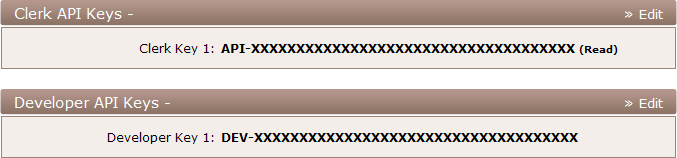
You can find the created Clerk and Developer API Keys at the bottom of your "My Account" page:
Step 2. Copy the ClickBank Bonus Script to your hosting account.
For the simplicity, let's install the ClickBank Bonus Script to a folder 'bonus' in the root of your domain (e.g. http://www.yourdomain.com/bonus/). You can rename it later if you wish.
Copy the downloaded archive with the script to the root of your domain and unpack it. This will create a folder 'bonus' with 3 files:
- 'processor.php' (the actual ClickBank Bonus Script)
- 'error.tpl' (HTML-formatted template for error messages, see below)
- and '.htaccess' (Apache's configuration file that prohibits listing of files in the folder).
Step 3. Set up the ClickBank Bonus Script
Now, you have to edit the 'processor.php' file with any simple text editor.
There are several definitions that you have to change. At the top of the file, below the copyright notice, find the lines like define('PARAM', 'VALUE'); and change their values.
| CB_DEVELOPER_KEY | This must be your Developer API Key |
| CB_CLERK_KEY | This must be your Clerk API Key |
| SUCCESS_URL | URL of your page with bonuses |
| ERROR_TEMPLATE | A path to a local file with an HTML-formatted template for printing error messages (by default this is set to 'error.tpl' from the downloaded distribution; see below for details on this topic) |
| VENDOR_ID | Leave this parameter empty if a customer may purchase any ClickBank product through your hoplink to get your bonuses. Or, write a comma-separated list of acceptable vendors |
| ERROR_ON_REFUND | This can be 0 or 1. In case of 1, a customer won't be redirected to your page with bonuses if he/she has refunded their payment. |
| ERROR_ON_CANCEL | This can be 0 or 1. In case of 1, a customer won't be redirected to your page with bonuses if he/she has canceled their subscription (for recurring billing products). If the initial payment for the subscription is quite high, you should set this to 0. |
| ERROR_MSG_* | You can modify error messages here (e.g. you want to translate them into other language). |
Step 4. Create a form on your Review page
At this stage, you can put a special form to your page with a review of some product (or to any other page you want). This form have only one input (ClickBank Order #), which will be posted to the ClickBank Bonus Script (processor.php).
You have to change the action value to the appropriate URL-address of the 'processor.php'. HTML is a very simple language and you can modify this form in any way you wish. The most important thing is that there must be a text-input with name "receipt".
(Optional) Step 5. Error Messages Template
In case of some error (like you aren't an affiliate or the purchase, the purchase has been refunded, etc.), the ClickBank Bonus Script read the HTML-template file (see the ERROR_TEMPLATE definition), substitutes its variables and prints it to the customer.
This must be a local file (present on your hosting account).
There are 2 variables that you can use in your error template:
| %PROVIDED_RECEIPT% | Will be replaced with the ClickBank Order Number entered by the customer |
| %ERROR_MESSAGE% | Will be replaced with a received error message. |
You can find and use the example of this template inside/from the downloaded distribution.
Several bonus pages for different vendors
Here's the final thing you should know about our ClickBank Bonus Script. If you promote several products and for each of them you give different bonuses, then:
- Copy the 'processor.php' script as many times as many products you promote (e.g. copy it to 'processor2.php', 'processor_vendorx.php', etc.).
- Set up each copy of the ClickBank Bonus Script appropriately.
- On your review pages of different products set various values for the actions of the forms (e.g. action="http://www.yourdomain.com/processor2.php", and so on).
---
Should you have any questions about our ClickBank Bonus Script, you can contact our support.